This started out as a joke. My sister was telling me her husband kept complaining his toes were cold. She’d tell him to go put on some socks or slippers. He’s answer that his foot wasn’t cold, just his toes. And then she tells me, “Wouldn’t it be funny if you could make him some socks that only cover his toes?” So I did. And he loves them. And in case there’s any other cold toed folks out there, I’m sharing the pattern with you. I present:  Jim’s Toe Warmer Socks I used Bernat Denim Style; you can use whatever worsted/aran weight yarn you’d like. Cast on 20 st with size 8’s, then divide onto 2 needles by slipping them alternately onto each one; 1 st onto the back, then 1 st onto the front, and so on – 10 on each needle. Knit 1 round even. Increase 4 st this round by Kf&b into the 1st st and last st on each needle. Knit 1 round even. Increase every other round until 40 st total. Knit even for as many rounds as will reach the ball of the foot of the intended victim. I stopped at 30 rounds from cast on as my sister measured his toe to ball for me at about 5 inches. At that point, I switched colors to blue and size 6’s and knit ribbing for 8 rounds. Bind off on rnd 9. If you’d rather, keep the ribbing the same color.
Pic of the corn, with Chris added in for scale:

Chris and somebody’s tomato plant, mabye this one is David’s?

Chris’ tomato plant and many many oregano’s:

Patrick’s tomato plant:


Russ’ jalapeno plant:


Cuke’s:

The 2 surviving bean plants, and some carrots:

Lettuce between the corns:

And we’ll end with a Nathan photo-bomb:

I finally figured out something awesome to do with those leftover spider rings from Halloween I keep finding around the house and the garage. I was on my way outside to hang the clothes up on the line when I saw one in the yard. I thought, “Hey, let’s see if I can freak out Chris and Nathan…”
So, I put in on my toe, started hanging up the clothes, and waited for Chris or Nathan to notice.
Which they didn’t.
And I completely forgot about it.
And if you know me, you can imagine what happened next.
In completely unrelated news, I found out I still can hold my bladder when I get really really scared.
…at this very moment, I was just so happy. We had just been married, and I never imagined that 22 years from then I’d still be so happy. And here’s why:
1. Remember when we got married? And I was crying/blubbering through my vows? You didn’t look at the crowd and roll your eyes, as if to say “Can you believe this?” All you did was look at me with such love and encouragement in your eyes, and I love you for that.
2. That time 2 days into our honeymoon, in Atlanta, on the drive down to DisneyWorld, when I woke up with a horrible sore throat, and you got me breakfast in bed. Hot tea and toast has never tasted so good. I love you for that.
3. That time on the way home from our honeymoon, that drive through the mountains to Gatlinburg. At night. In the rain. And I got motion sickness so bad I couldn’t sleep on the waterbed that was in our honeymoon suite, so you fixed me a place on the floor to sleep, and didn’t make fun of me at all, but instead made sure you held my hand until I fell asleep. I love you for that.
4. That time a few months after my mom died, I remember we were going to go see a movie. And I was just so upset and sad. And you just took me to a book store instead, where I found that book Motherless Daughters, which told me that what I was feeling was normal and ok. I love you for that.
5. Remember when we decided it was time to have kids? I was supposed to take my pill that morning, and didn’t? And then later, after some, uh, “morning snuggles”, we went out to breakfast, and realized it was Mother’s Day? And the waitress asked if I was a mother, and you were all, “Well, you might be…” I love you for that.
6. Remember how when I was pregnant with David, I was all, “I do NOT want to you look down there while I’m pushing the baby out”. I thought you’d be, oh, I don’t know, traumatized or something, seeing me all stretched out like that. And how you snuck a look anyway? And then you were all, “It’s just fascinating!” I love you for that.
7. Remember that Valentine’s Day just before Patrick was born, and I was sooooo pregnant, and the JoyFM was having that concert, and we went, and you made me feel so beautiful that night? I love you for that.
8. Remember our anniversary just after Patrick was born? It was on a Sunday, and we drove out to Fort Pierce, to have our friend Pastor Steve renew our vows for us? And I wore my nursing dress, and it was just you and me and David and little bitty Patrick, and Pastor Steve. And then we went out to lunch. I love you for that. (and I’m still thinking we should plan a bigger bash one of these anniversary days…)
9. Remember building our dream house in FL? All the planning, and re-drawing of the plans, and stuff. I will never forget seeing those alternate house plans with the L-shaped staircase, and going “It’s the staircase from 7th Heaven!” And you were all, “Well, then, that settles it. We’ll go with those then.” I love you for that.
10. Remember when I was laboring with Patrick at the birth center, and you were all, “You can do this!” I love you for that.
11. Remember when Russ was born, and we thought/hoped/prayed that he’d be a girl? And then he came out with a penis? I will never forget that look on your face as you caught him, and handed him up to me. And I looked at your face, and just knew. That look said, “Oh, hon, it’s not a girl…but he’s still really really awesome!” And I looked at that little screaming face, and fell in love. With both of you. I love that you were kind of sort of sorry, but then again, not.
13. Remember when I was in labor with Christopher and those nurses were threatening me with interventions, and you convinced them to not only leave me alone for a little while, but also to “let” me get on my hands and knees to help bring the baby down? I love you for that.
14. And also when I was so worried about David, Patrick, and Russell since the stupid hospital didn’t allow kids in the labor room, and you kept going out to check on them for me? I love you for that.
15. Remember when Nathan was born, and you yelped out with joy “It’s a BOY!” I love you for that.
16. Know how you always give me back/shoulder rubs when something hurts? I love you for that.
17. Know how sometimes the back/shoulder rubs are just simple massages, and sometimes they have “benefits”? I love you for that.
18. The fact that you notice and even search out yarn stores when you’re away from home, and bring me yarn presents? I love you for that.
19. You pretty much always call me when you’re on your way home from somewhere, just to see if I need you to stop at the store and get something. I love you for that.
20. That you don’t just think my knitting/crocheting is cute; you’re proud and amazed by it to the point that you’ll brag on me when I’m making or wearing something I’ve made. I love you for that.
21. That you sing to me, and make me tear up. I love you for that.
22. That even when our anniversary doesn’t turn out like you thought, you still give me just what I need. Thanks for the PeptoBismul. I love you for that.
Happy Anniversary, hon! I can’t wait to think up 22 more!
…sub-titled Why I Will Never Go Anywhere Without Baby Wipes. Ever.
If you leave a brand new little packet/bowl thing of honey mustard dipping sauce in that space in your door handle long enough, it will smush open all over your hand and door when you least expect it.
Honey mustard dipping sauce smells really really strong. Even after the baby wipes.
Russell will clean all the sauce out of that space in the door handle, as well as wiping off all the spare change in there, for the small fee of all the spare change in there.
Except for the vacuum token for the car wash place. He says we can keep that coin.

See, Mom? I TOLD you I could do it myself…
Changes in Bold.
7:06 am – wake up to screams of “Mommy!!!!!!!!”
8:45 – drop David off at the high school for a dodge-ball tourney
10:30 – leave the house again for Patrick’s soccer game at 11
Noon – pick up lunch at McD’s
1 pm – put Nathan and Chris down for naps
1:10 – sit at the computer for a few minutes to jot down rest of schedule for the day
1:13 – hear Nathan yelling; go settle him in again
1:45 – leave the house again for Russell’s soccer game at 2:15
2:05 – Arrive at soccer game to find that Russ has brought the wrong jersey, and have to drive back home to get it.
2:45 – Get back onto interstate to see big wreck, and have to pull over 2 times to let rescue vehicles pass by.
3:00 – Get to soccer game and watch Russ play the second half.
2:45 – stop at Hy-Vee on the way home to take advantage of sale ad stuff
3:30 – Game ends late, and also running out of gas due to extra trip back home. Stop for gas and then on to Hy-Vee
4 – start dinner – taco’s
4:30 – Get home to realize that I never loaded up the dishwasher, so I don’t have a big pot to cook the taco meat in. Figures.
7 pm – start baths/showers for whoever needs them.
7:45 pm – take David over to friend’s house.
8 pm – put Chris and Nathan in bed.
8:30 – put Patrick and Russ in bed.
11 pm – go pick up David from friend’s house.
11:15 – Collapse in bed, and try to focus on getting everybody up and ready for church in the morning. Oh, and Russ has another soccer game. Right after church.
Somewhere in there remind myself that it is truly a blessing to have kids who want to be so active, and to not project my “need to be a hermit all the time” introvert-ness on them
7:06 am – wake up to screams of “Mommy!!!!!!!!”
8:45 – drop David off at the high school for a dodge-ball tourney
10:30 – leave the house again for Patrick’s soccer game at 11
Noon – pick up lunch at McD’s
1 pm – put Nathan and Chris down for naps
1:10 – sit at the computer for a few minutes to jot down rest of schedule for the day
1:13 – hear Nathan yelling; go settle him in again
1:45 – leave the house again for Russell’s soccer game at 2:15
2:45 – stop at Hy-Vee on the way home to take advantage of sale ad stuff
4 – start dinner – taco’s
7 pm – start baths/showers for whoever needs them.
Somewhere in there remind myself that it is truly a blessing to have kids who want to be so active, and to not project my “need to be a hermit all the time” introvert-ness on them
Wait, longer than that. Well, let’s just include the knitting/crocheting time, not the summer when the boys and I actually dyed the yarn. CHRISTOPHER’S BABY BLANKET IS FINALLY FINISHED!!!!!!!! And, the coolest part is – I finished it up in the same place I started it – Disney’s private island Castaway Cay. We went on a DVC member’s cruise last week, just like the one back in September of 2010, and I knew I was almost done, so the blanket came with us to the beach.
Once again, Steve humored me by taking a few pictures of me finishing it up.

Funny thing – the ball rolled towards the water, and I was all “Steve, get a picture of that – it’s hilarious! I bet there’s never been a ball of yarn on Castaway Cay’s beach before!”

Steve was all “It’s alright everyone – IT’S SUPERWASH.”

And here I am, blanket complete. Then Steve went and bought me a pina colada. Well, 2 of them actually.

And for those of you reminiscing, here’s the start of the blanket:

Now, what am I going to do for Nathan’s baby blanket?
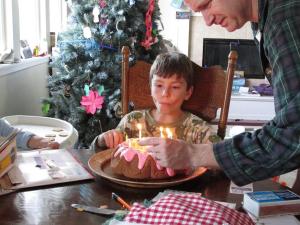
So, in keeping with the backwards fashion, the thing that happened before the New Year’s Eve snowfall was Russell’s 9th birthday. He picked out a strawberry-flavored cake, and then wanted cherry frosting. Um, ok then.
Here’s the birthday boy and Daddy sticking the candles on. And yes, we’re still in pj’s.
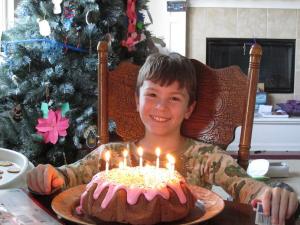
Look at that smile – isn’t he gorgeous?
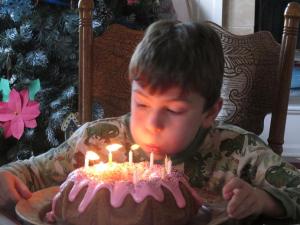
And the blow-out:
I completely forgot to get any pictures of him opening up presents, so that’s it. Stay tuned for Christmas…


